Table of contents
- Prerequisites :
- What is Kubernetes?
- Why Kubernetes?
- Kubernetes Architecture :
- <mark>Control Plane Node</mark> :
- API Server :
- Scheduler :
- Controller Manager:
- etcd:
- CCM:
- <mark>Worker Node</mark> :
- Kubelet :
- Kube-proxy :
- Pods :
- Containerd :
- <mark>Let's Discuss some of the Kubernetes Commands :</mark>
- <mark>Note:</mark> Every Command starts with kubectl , for any sort of operation. kubectl is a command line tool for Kubernetes, that is used to interact with the cluster.
- Kubernetes Namespaces :
- Labels & Selectors:
- Pods in Kubernetes:
- Pod Lifecycle :
- init Container, Multiple init Container & Multi Container :
- PROBES :
- <mark><-</mark>*->To be continued in part 2<-->\*
- <mark>CREDITS :</mark>
Prerequisites :
Knowledge of Container/Docker. [These 3 resources you can refer to for Docker]
- Knowledge of YAML. [ Checkout this video ]
What is Kubernetes?
Kubernetes is known as K8s, an Open Source Container orchestration tool for automating deployment, scaling & management of containerized applications.
Why Kubernetes?
A few containers are fine but what about large scale?
How to monitor them?
What about running pods on multiple nodes?
What about flexibility?
Autoscaling?
Scheduling
Self-healing capabilities
Kubernetes Architecture :
K8s components are mainly divided into two parts. Those are ->
Control Plane Node :
We call it Control Plane Node because it controls your cluster and consists of all the cluster controlling tools init. The components are ->
API Server
Scheduler
Controller Manager
etcd
ccm
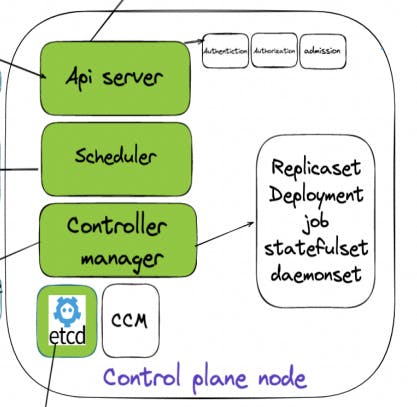
Control Plane Node Architecture
API Server :
The API server is the main brain of Kubernetes. Whatever you are doing or whatever calls you are giving, all the calls are going to the API server. Then the API server will do three things ->
Authentication
Authorization
Admission
Scheduler :
The scheduler is the most intelligent component in the Kubernetes system. The scheduler is responsible for finding the best-fit node to run your pod.
Controller Manager:
The controller manager is responsible for making sure that your desired/copies of replica sets are running fine. And also make sure the Actual state = is the Desire state.
If any Pods go down Controller manager will talk to the API server & make reconciliation happen.
etcd:
etcd is a key value database of your Kubernetes system. It is responsible for storing all the cluster information.
Note : [ The API server only talks to the etcd & no other components will talk to the etcd ]
CCM:
CCM stands for cloud controller manager. CCM is responsible for talking to the cloud & Kubernetes cluster to perform certain actions.
Worker Node :
In these worker nodes, our applications will be running. The components are ->
Kubelet
Kube-proxy
Containerd
Pods
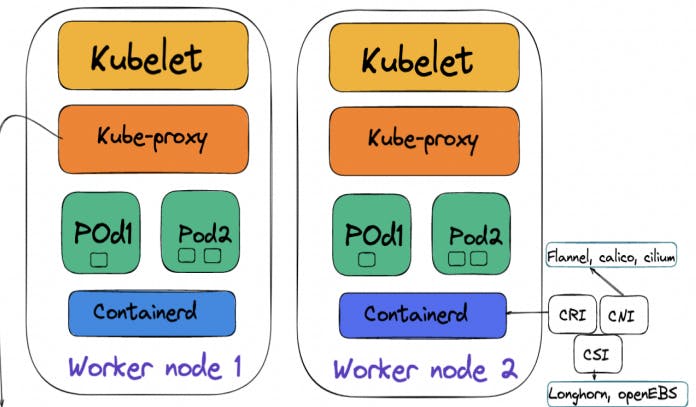
Worker Node Architecture
Kubelet :
Kubelet is responsible for performing the task given by the API server.
Kube-proxy :
kube-proxy is responsible for maintaining the network rules on nodes. This network rule allows your pods inside your cluster & also outside the cluster.
Pods :
Here your containerized application is inside it.
Containerd :
Containerd is responsible for fetching the image from the registry to run the pods using the Container Runtime Interface (CRI) and also attaching the Container Networking Interface(CNI), and Container Storage Interface(CSI).
Let's Discuss some of the Kubernetes Commands :
Note: Every Command starts with kubectl , for any sort of operation. kubectl is a command line tool for Kubernetes, that is used to interact with the cluster.
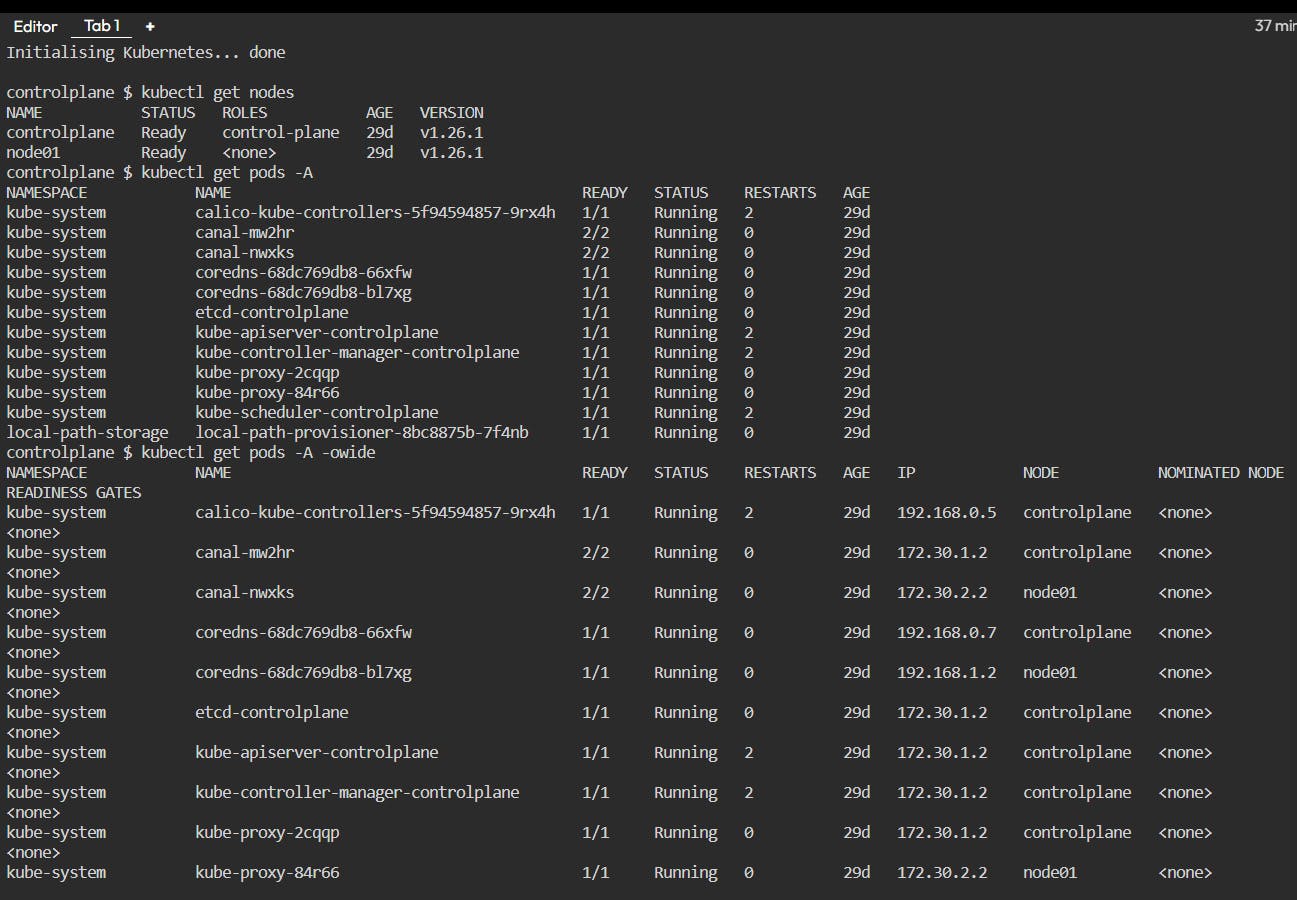
kubectl get nodes
This command will give you the name of the Control plane/Master node & the list of Worker Nodes If the cluster consists of more than one Worker node.
kubectl get pods -A
This will give you the list of pods that are running inside your cluster.
kubectl get pods -A -owide
This will give you the list of where the pod is running in which node(Control plane node or Worker node).
Example image ->
Kubernetes Namespaces :
What are Namespaces?
It helps to isolate the environments to the teams like a separate environment(Resources, Policies, Networking policies, etc) for the Developers team & Testing team.
A different version of applications & grouping resources separately like Monitoring, Databases, etc.
There are five different types of namespaces are there (Current Kubernetes Version = 1.26).
default
-> Here are your application pods running in this namespace.
kube-public
-> This namespace is having the cluster-info.
kube-system
-> Here your system pods are running.
kube-node-lease
-> This namespace has heart-beats details of the nodes.
local-path-storage
-> It is a Kubernetes storage provisioner that creates a hostPath volume on the node where the Pod is scheduled.
kubectl get ns
      or
kubectl get namespace
This will give you the list of the Namespaces.
Note :
You can't create two pods with the same name in the same namespace.
Labels & Selectors:
In Kubernetes, labels and selectors are used to identify and group together related resources, such as pods, services, and deployments.
Labels are key-value pairs that can be attached to Kubernetes resources, such as pods. They are used to mark resources in a way that is meaningful to users, such as identifying which environment the resource is deployed in, which team owns the resource, or which version of the application is running.
For example, you can add the following label to a pod:
apiVersion: v1
kind: Pod
metadata:
  name: my-pod
  labels:
    app: my-app
In this example, the app label is set to my-app. You can use any key-value pairs for labels, and you can add multiple labels to a resource.
Selectors are used to finding resources based on their labels. They allow you to select a subset of resources based on their labels, and perform actions on that subset of resources.
For example, you can use the following selector to find all pods with the app label set to my-app:
apiVersion: v1
kind: Pod
metadata:
  name: my-pod
spec:
  containers:
  - name: my-container
    image: nginx
selector:
  matchLabels:
    app: my-app
In this example, the matchLabels selector is used to find pods with the app label set to my-app. You can also use other types of selectors, such as matchExpressions, to select resources based on more complex criteria.
Labels and selectors are used throughout Kubernetes to manage and orchestrate resources. They allow you to organize your resources in a way that is meaningful to your organization, and make it easy to find and manage related resources.
Pods in Kubernetes:
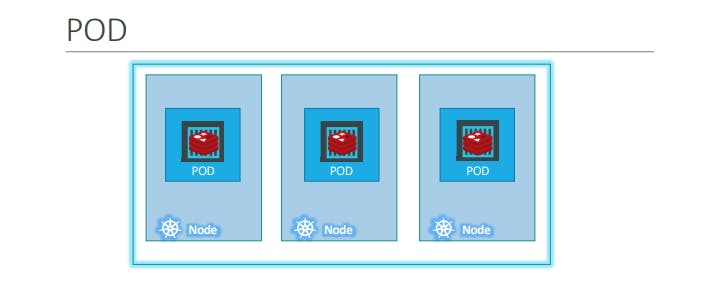
In Kubernetes, anything you run runs as a pod. With Kubernetes, our ultimate aim is to deploy our application in the form of containers on a set of machines that are configured as worker nodes in a cluster. However, Kubernetes does not deploy containers directly on the worker nodes. The containers are encapsulated into a Kubernetes object known as PODs. A POD is a single instance of an application. A POD is the smallest object, that you can create in Kubernetes.
Pod Lifecycle :
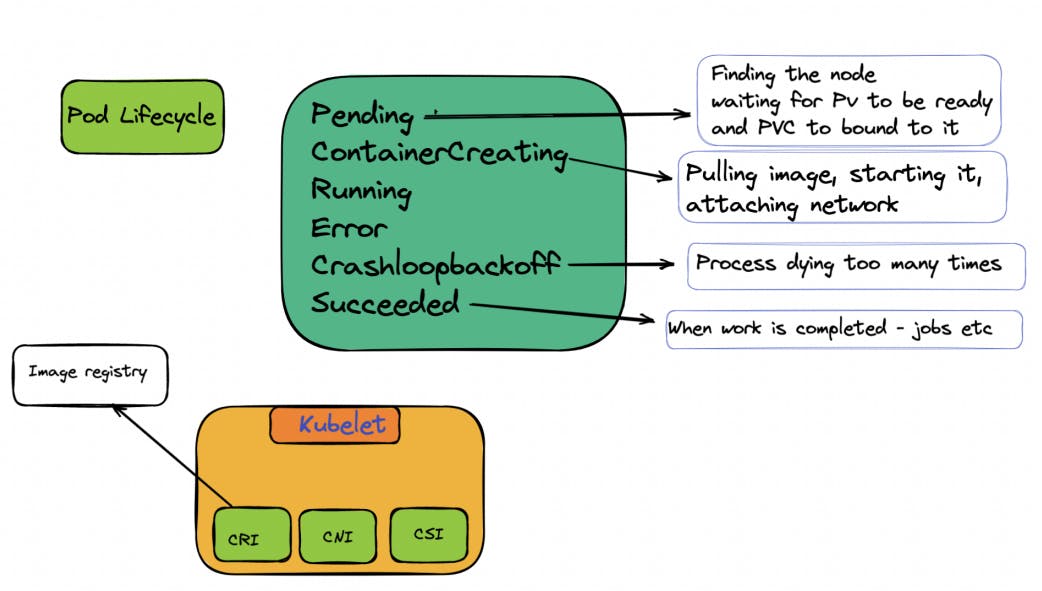
In Kubernetes, a pod is the smallest deployable unit that can be created and managed. A pod represents a single instance of a running process in a cluster.
The lifecycle of a pod in Kubernetes can be divided into several phases:
Pending: In this phase, Kubernetes is scheduling the pod to run on a node. During this phase, the container image is downloaded, and the necessary resources are allocated.
Running: Once the pod is scheduled on a node, it enters the running phase. The container is started, and the pod is running.
Succeeded: When the container completes its execution successfully, it enters the succeeded phase. The container is still running, but it has completed its task.
Failed/Error: When the container encounters an error during its execution, it enters the failed phase. The container is still running, but it has failed to complete its task.
CrashLoopBackOff: If a container fails to start, Kubernetes will automatically restart it. If the container repeatedly fails to start, it enters the CrashLoopBackOff phase.
Unknown: If the pod's state cannot be determined for some reason, it enters the unknown phase.
Once a pod enters the succeeded or failed phase, it can be deleted, and Kubernetes will automatically clean up any resources associated with the pod. If a pod enters the CrashLoopBackOff phase, Kubernetes will keep trying to restart the container until it succeeds or the pod is manually deleted.
init Container, Multiple init Container & Multi Container :
init Container :
In Kubernetes, an init container is a container that runs and completes before the application container starts. The primary purpose of an init container is to perform initialization tasks such as setting up configuration files, initializing a database, or downloading assets before the application container starts.
The Use cases of init containers in Kubernetes are :
Isolation: Init containers run in their own container and namespace, which isolates them from the main application container. This isolation ensures that the initialization tasks do not interfere with the application container's runtime environment.
Order: Init containers can be used to ensure that initialization tasks are performed in a specific order. Kubernetes guarantees that init containers are started in order and that the next container does not start until the previous one has been completed successfully.
Dependency management: Init containers can be used to manage dependencies between containers. For example, an init container can be used to download a required library or configuration file that is needed by the main application container.
Error handling: Init containers have their own lifecycle, and if an init container fails to complete successfully, Kubernetes will automatically restart it until it succeeds. This ensures that the initialization tasks are completed successfully before the application container starts.
Overall, using init containers in Kubernetes helps to simplify the deployment process and ensure that applications start-up reliably and predictably.
Multiple init Container:
Multiple init containers in a Kubernetes pod allow for the sequential execution of tasks before the main container starts. They can be used for tasks such as configuration management, data initialization, database initialization, and authentication/authorization. Each init container must complete successfully before the next one starts.
Multi Container:
In Kubernetes, a multi-container pod is a pod that contains more than one container. Each container in a multi-container pod shares the same network namespace, which means they can communicate with each other using localhost. They also share the same volume mounts, which makes it easy for them to share files.
PROBES :
In Kubernetes, probes are used to determine the health and readiness of a container running within a Pod. Kubernetes provides three types of probes:
Readiness probe:
This type of probe is used to determine if a container is ready to receive requests. Kubernetes sends periodic readiness probes to determine if the container is ready to receive traffic. If the readiness probe fails, the Pod is removed from the service endpoints until it passes.
Liveness probe:
This type of probe is used to determine if a container is still running. Kubernetes sends periodic liveness probes to determine if the container is still running. If the liveness probe fails, Kubernetes restarts the container.
Startup probe:
This type of probe is used to determine if a container has started. Kubernetes sends startup probes before the liveness and readiness probes to determine if the container has started. If the startup probe fails, Kubernetes restarts the container.
Probes are essential for ensuring the reliability of applications running within Kubernetes clusters. By using probes, Kubernetes can detect when a container is unhealthy, and it can take action to restart or remove the container as needed. This helps ensure that applications remain available and responsive to user requests, even in the face of failures or issues within the cluster.
<-*->To be continued in part 2<-->\*
RESOURCES :
CREDITS :
Kubesimplify community is founded by Saiyam Pathak.
Saiyam is a CNCF, Traefik and Portainer Ambassador, CKA/CKAD/CKS certified, InfluxAce. He regularly contributes to the community by writing blogs and organizing local meetups for K8s, Rancher, Influx, and CNCF. He has also written a book Let's Learn CKS Scenarios that helps people prepare for CKS certification.KodeKloud
